Iterate AI
Nov 12, 2024
To set up funnel analysis in Mixpanel, follow this detailed step-by-step guide. This process will help you track user interactions through a series of defined events, allowing you to analyze conversion rates and identify where users drop off.
Part 1: Setting Up Funnels in Mixpanel
Step 1: Install Mixpanel
Install the Embed Script
Get Your Token: When you sign up for Mixpanel, you will receive a token. If you need to find it later, go to your dashboard, click on your name in the upper right corner, and select "Project settings."
Add the JavaScript Library: Insert the following code snippet into your website's HTML, replacing YOUR_TOKEN with your actual token:
Check out the detailed guide to setup mixpanel on React and Flutter.
Using Segment: If you're using Segment for data collection, follow this guide to integrate Mixpanel with Segment.
Step 2: Define User Profiles and Properties
Create Profiles and User Properties
Identify Users: Use mixpanel.identify("USER_ID") to assign unique identifiers to users. This is particularly useful for tracking users across multiple platforms.
Store User Profiles: You can store additional user properties (like email or source) by using mixpanel.people.set() method.
Step 3: Set Up Event Tracking
Track Events
Define Events: Work with your development team to define the key events that represent user actions in your product (e.g., "Sign Up", "View Dashboard").
Implement Tracking Code: Add tracking code to your application where these events occur using:
Keep Events General: Ensure that event names are meaningful and general enough to capture significant user actions.
Step 4: Create Your Funnel
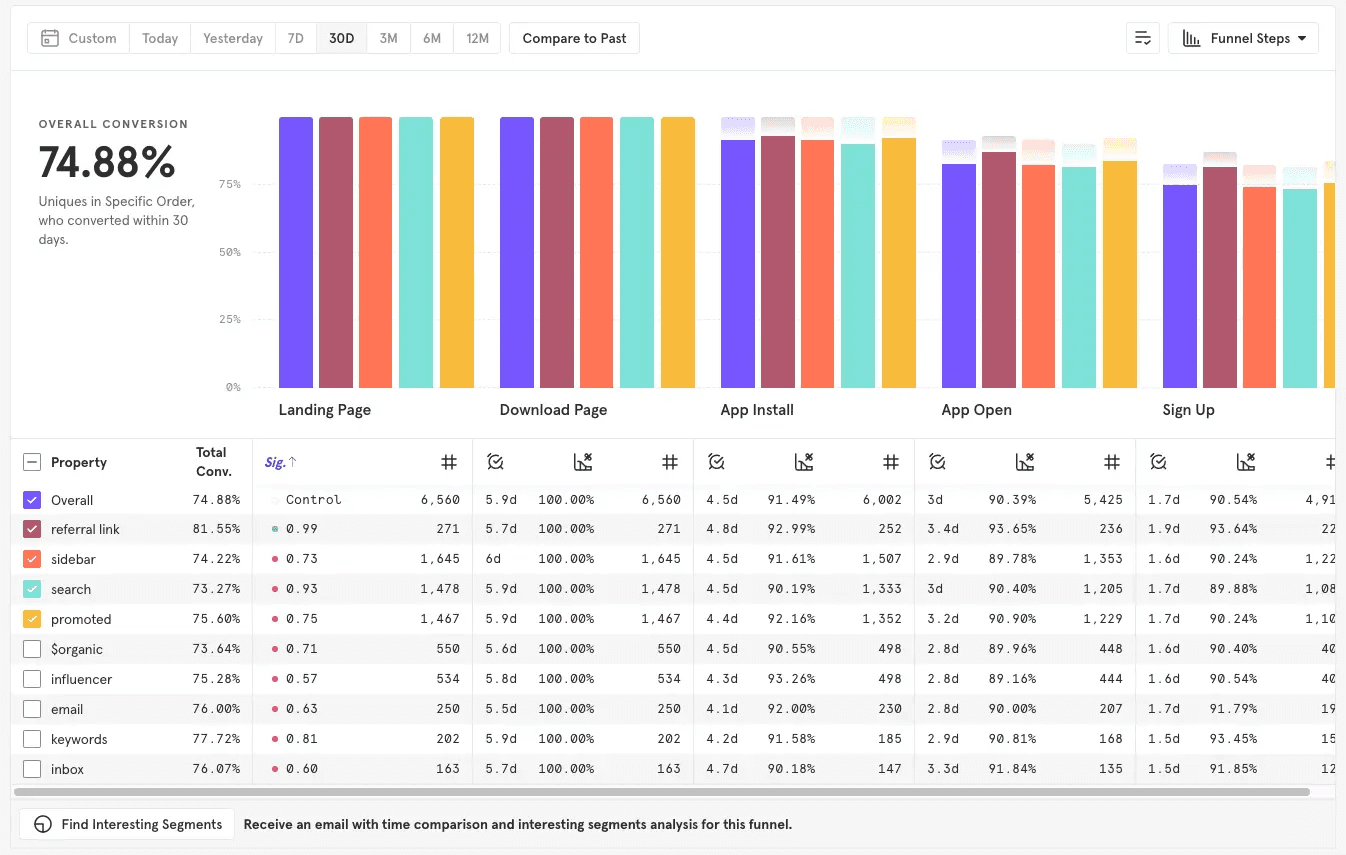
Access the Funnels Report: Go to the Funnels section in Mixpanel's dashboard, where you can view, create, and analyze funnels. This feature allows you to visualize the user journey from one action to another over time, giving insights into which steps have the most conversions or where users drop off.
Create a New Funnel: Start by clicking on the "+" or "Create Funnel" button. This opens a setup screen where you can start defining the steps you want to include in your funnel.
Select Events for Each Step: Choose the specific events you want to track at each stage of the funnel. For example, you might define the steps as “Sign Up” > “View Dashboard” > “Complete Profile.” Arrange these in a sequence that represents the user journey you’re interested in. Mixpanel lets you easily reorder steps by dragging and dropping them as needed, allowing flexibility as you refine your funnel over time.
Explore Drop-off Points and Paths: The “View as Flow” feature enables you to see alternative paths users take, including those that didn’t lead to a successful conversion. This visual flow helps you understand where users might get distracted or discouraged, so you can refine your funnel to reduce these drop-offs.

Part 2: Analyzing your Funnels
Step 5: Selecting Conversion Criteria
Establish Conversion Criteria based on what you want to track. You may want to measure "unique conversions" to understand the number of distinct users who complete the funnel, or "total conversions" to track multiple completions by the same user. Additionally, you can set conversion windows that specify the maximum time allowed between each step, helping to focus on timely user actions within the funnel.
Step 6: Add Filters
Filters allow you to narrow down the funnel to specific user actions or characteristics. For example, if you only want to analyze users on mobile devices, you can add a filter for "Platform" and choose only mobile. Filters help remove irrelevant data and focus on the users you’re most interested in. You can also filter the funnel by hour.
Properties help you dig deeper into user behavior by segmenting your data based on specific traits or event details, such as a user’s location or device type. Properties give you a clearer picture of which user segments complete your funnel and which ones drop off. You can apply these properties to individual steps or across the entire funnel to explore the influence of these factors.
Define a Timeframe to specify how much time users have to move through each funnel step. You can set this to minutes, days, or weeks depending on the typical user journey you’re analyzing. If you’re tracking short, immediate actions, a shorter timeframe may reveal how quickly users convert. For longer-term activities, a broader time frame gives you a better view of engagement over time.
Step 7: Segment Data by Cohorts
Mixpanel’s cohort analysis feature allows you to organize users into specific groups based on their behaviors or shared characteristics, such as “new signups” or “active users.” This grouping enables a detailed analysis of how different user types navigate the funnel and where they might encounter difficulties. For instance, if new users have a higher drop-off rate than returning users, you might need to adjust onboarding processes to better retain newcomers. Creating these cohorts helps you tailor optimizations more effectively, addressing each group’s unique needs.
Step 8: Monitor Conversion Rates
Begin by examining the conversion rates for each funnel step. This will help you identify where users drop off and which steps may need improvements to increase user retention. High drop-off points indicate where users lose interest or encounter obstacles, so these steps are crucial to optimize. By regularly checking conversion data, you can observe trends over time and spot any unusual changes, helping you stay proactive in managing user flow.
Conclusion
Setting up funnel analysis in Mixpanel helps you understand your users’ journey and identify where they might lose interest or face challenges.
By following these steps—from installation and event tracking to analyzing conversion rates and testing improvements—you can gain valuable insights into how users interact with your product.
With these insights you can now improve different steps of your funnel by making small discrete changes or running experiments in the form of A/B tests.
